Properties - Operations
Rename a job
Jobs can be renamed. Jobs should be renamed to make them easier to identify, for example if the same image has been imported multiple times or if jobs have been duplicated.
- Enter a suitable name for [Job Name] in the [Properties] tab, then click [Rename].
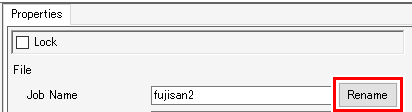
- The job will be renamed.
- [Job Name] in the [Job List] will also be changed accordingly.

Print a full-color job in monotone
This is used in situations such as when printing with special color inks (e.g., white or clear).

- This can be set when the original image data is in CMYK color mode.
- This operation can also be used with vector or raster images.
- [Job Attribute] of job which is set [Variable Edit] can't change.
- Select a job for which [Job Attribute] is set to [Full Color] in the [Properties] tab.
- Select [Mono Color] in the [Job Attribute] list.
- The [Job Attribute] dialog appears.
- Select the color in the original image to be replaced in [Source color].
- Select the ink color to be used in [Ink].
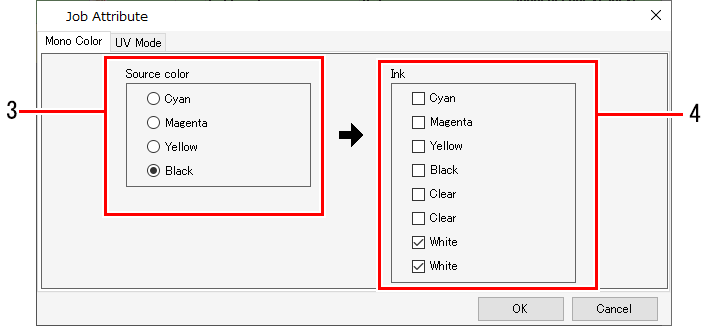
- If more than one identical color exists, that ink color can be selected multiple times.
- In the case of full-color images, information for colors other than those specified as [Source color] will be discarded and those colors will not be printed.
- The ink density for printing will use the density for [Source color].
- With a UV printer, the UV mode settings may vary depending on the ink after replacement. Recheck the [UV Mode] tab.
- Click [OK].
- [Job Attribute] will be changed to [Mono Color] in the [Properties] tab.
- [Thumbnail] and [Attribute] in the [Job List] tab will be updated to match the conditions set.

Editing the settings for a special color job created using Special plate
The ink color and ink density can be changed for special color ink if [Job Attribute] is set to [Special Color].
- Select a job for which [Job Attribute] is set to [Special Color] in the [Properties] tab.
- Click [Setup] for [Job Attribute] in the [Properties] tab.
- The [Job Attribute] dialog appears.
- Set [Ink] and the corresponding ink density.
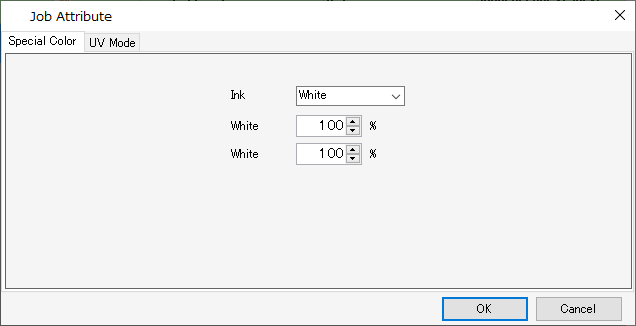
- Click [OK].
- The [Thumbnail] and [Attribute] in the [Job List] will be updated accordingly if the ink is changed.

Edit UV settings
The UV settings can be edited if using a UV printer.
- Click [Setup] for [Job Attribute] in [File].
- The [Job Attribute] dialog appears.
- Set the UV mode (printing method) for printing.
- The details that can be set will vary depending on the individual model and job attributes.
UV Mode settings
- Click [OK].
- The UV settings are applied.
UV Mode settings
The UV Mode can be used in combination with UV printers and job attributes as follows.

- SIJ-320UV, UJV55-320
・ When [Job Attribute] is "Color", or "White"
- JFX600
Models: UJV100, UCJV300, UCJV330, UJV100 Plus
| [Panel Setting] | : | Prints using the printer UV settings. |
[User Definition] | : | Prints using the UV irradiation set on this screen. |

Models: UJF series (Excluding UJF-7151plusII LH100)
| Sets the UV irradiation level and the number of times and irradiation level for additional illumination during printing. | ||

- When [Job Attribute] is set "Color", glossy print is available.
For more information refer to the separate "Color Printing Guide".
Models: JFX200EX, JFX200-2513, JFX500
| [Panel Setting] | : | Prints using the printer UV settings. |
[User Definition] | : | Prints using the UV irradiation set on this screen. |

・ When [Job Attribute] is "Clear", glossy print is available.
- [Glossy Print]
can be printed using irradiation settings to produce a smooth, glossy surface. - [Matte Print]
can be printed using irradiation settings to produce a matte finish with a rough surface. - [Emboss Print]
allows embossing to be achieved by overlay printing with clear ink multiple times.
Model For more information on how to print using clear ink, refer to the "Clear Ink Printing Guide".
Models: UJV100, UCJV300, UCJV330, UJV100 Plus
| [Glossy Print] | : | No setting items required. |
[Matte Print] | : | Illuminance can be set. |

Models: UJF series, JFX series (Excluding JFX600)
[Panel Setting]
| The UV illuminance will be the value set on the printer panel. Allows the number of clear plate overlaps to be set. |

[Emboss Print]
| [Illuminance] | : | Sets the illuminance for printing. |
[Print] | : | Sets the number of overlay printing times. | |
[Additional UV irradiation] | : | With emboss printing, the ink does not cure with irradiation alone when printing, thus necessitating additional irradiation. Set the number of irradiation cycles together with the irradiation illuminance. |

[Glossy Print]
| [Additional UV irradiation] | : | Performs additional irradiation to ensure complete ink curing after clear ink printing. The number of irradiation cycles can be set together with the irradiation illuminance. |

- For JFX200EX

[Print bottom clear liquid]: Prints a matte finish in clear ink over the colors.
For more information, refer to the separate "JFX200 Clear Ink Printing Guide".
[Matte Print]
| [Illuminance] | : | Sets the illuminance for printing. |
[Additional UV irradiation] | : | Set when additional irradiation is required. Sets the number of irradiation cycles and irradiation illuminance. | |

[Print and Irradiation]
| Prints clear ink without using irradiation. | ||
[Print] | : | Sets the number of overlay printing times. | |
[Irradiation] | : | Sets the number of irradiation cycles and irradiation illuminance after printing. | |

[Irradiation Only]
| Performs irradiation only. | ||
[Irradiation] | : | Sets the number of irradiation cycles and irradiation illuminance. | |

Models: JFX600
| There are no setting items for [Glossy Print] and [Matte Print]. [Emboss Print] | ||
[Illuminance] | : | Sets the illuminance for printing. | |
[Print] | : | Sets the number of overlay printing times. | |

・ When [Job Attribute] is "Primer"
- JFX600
Models: UJF series
| The same setting are available as when [Job Attribute] is "Clear". |
Models: JFX200-2513, JFX200EX, JFX500
| The same setting are available as when [Job Attribute] is "Color". |
Change the 2.5D Texture Maker settings
Configure the 2.5D Texture Maker settings.
For more information, refer to the "2.5D Texture Maker Guide" for the corresponding printer.