Print & Cut - Operations
Set a print & cut job
Import print & cut data, then configure the various settings.
- Import the print & cut data.

|
|
| |
|

 ] icon indicating cutting is displayed on the thumbnail for the cut job.
- When a cutting device is linked to a print & cut machine, use [Cut with a cutting device] to select the device to which cut data is output.
- The [Cut Path] and [Option] setting items on the [Cut Edit] tab will change depending on the output selection.
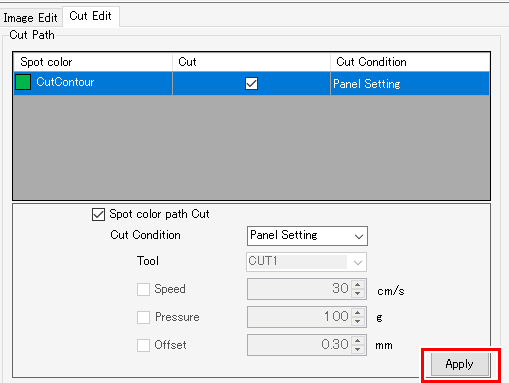
- Select one spot color to be cut from the spot color list displayed for [Cut Path] on the [General Print] - [Cut Edit] tab.
- Different cutting methods can be set for each spot color.
- Select the [Spot color path Cut] check box. (The default value is On)
- The path created using the selected spot color will be cut.
- Select the conditions from the [Cut Condition] list.
- Selecting [User Definition] allows the cutting method to be set.
- Sets the cutting method.
[Tool] | : | Select the cutter. |
[Speed] | : | Set the cutting speed. |
[Pressure] | : | Set the cutter pressure. |
[Offset] | : | Correct the cutter center position. |

- Refer to the operation manual for the corresponding printer for more information on cut conditions, as the appropriate values will vary depending on the media and cutter.
- Set the cutting options in [Option]
- [Sort]
Selecting this sorts according to the optimum cutting order to reduce the cutting time.
- [Sheet Feed]
When selecting this, feed the media before cutting to check if the job can be cut.
- [Approximation Type]
Selects the method used for cutting curves.
[Straight Line] | : | Cuts by approximating curves to a series of short straight lines. |
[Arc] | : | Cuts by approximating curves to a series of short arcs. |
When outputting to a print & cut machine |
- Cut Pinch Roller Pressure
Sets the pinch roller pressure during cutting.
- [Auto Cut]
Selecting this automatically cuts the media once cutting has ended.
[Max Data Length +] | : | Sets the length from the end of the job to the position where it is to be cut. |
[Detail Cutting] | : | Selecting this cuts jobs laid out as copies after each line printed. |
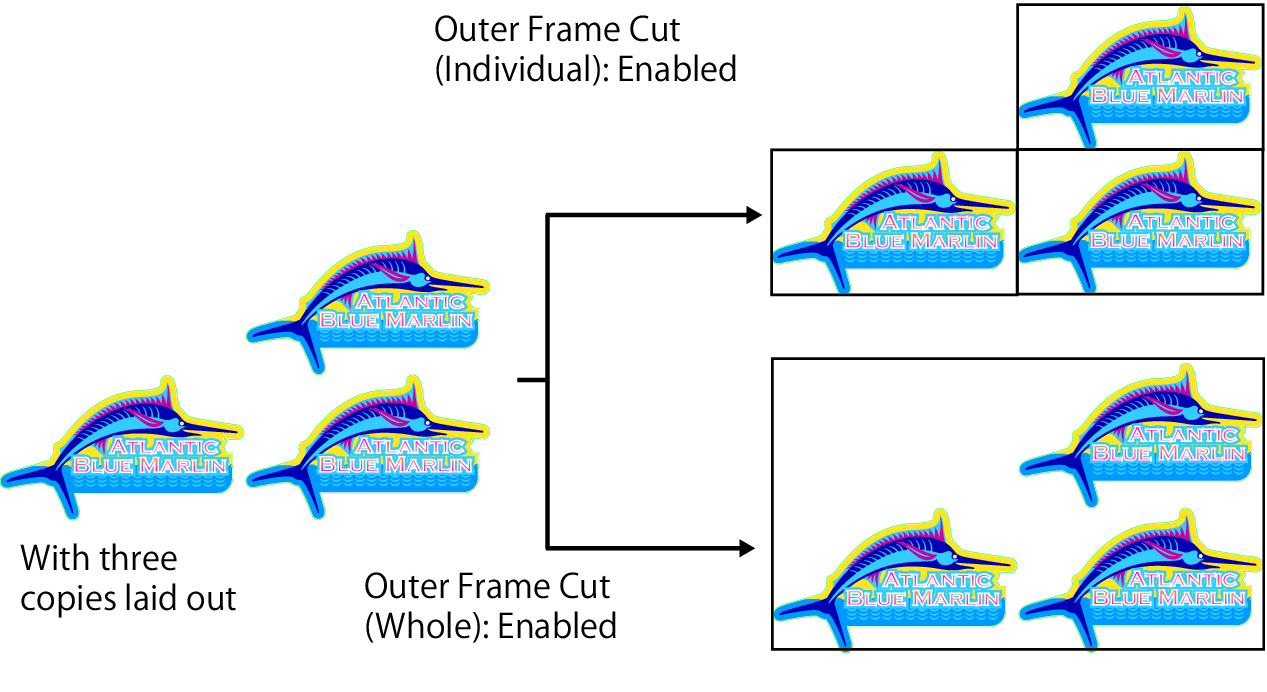
- [Outer Frame Cut]
Cuts the rectangle forming the job border or the rectangle of the entire job.
[Outer Frame Cut (Individual)] | : | Selecting this cuts a rectangle for each job. |
[Outer Frame Cut (Whole)] | : | Selecting this cuts a rectangle for the entire job. |
Clicking [Detail] allows the cutting conditions to be set. | ||
- [Heater Temperature After Print] (only for models equipped with a heater)
Selecting the [Heater Off] check box turns off the heater when cutting.
- Depending on the media, heat from the heaters may cause distortion, reducing the cutting accuracy.
The heaters should be turned off in such cases.
When the output destination is a cut device The settings vary depending on the cut device. |
◆ CG-AR |
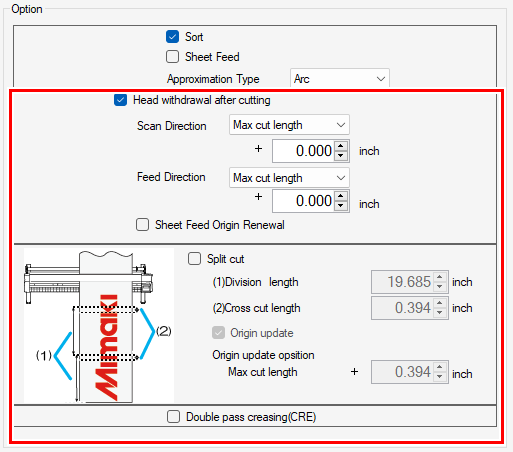
- Head withdrawal after cutting
Sets the head position after cutting has ended. Sets the position with respect to the reference position (select [Max cut length] or [Current origin]). Selecting [Update sheet feed direction origin] sets the position after head withdrawal to the origin. Selecting this when using continuous output with identical sheets helps to prevent mistakes involving cutting over the previous cutting position.
- When the [Split cut] check box is selected
The [Head withdrawal after cutting] option is disabled, and the head is withdrawn to the position set for [Origin update] in [Split cut]. - When two or more copies are set for [General Print] and [Individual registration marks] is selected
The [Head withdrawal after cutting] option is disabled, and [Head withdrawal after cutting] is not performed.
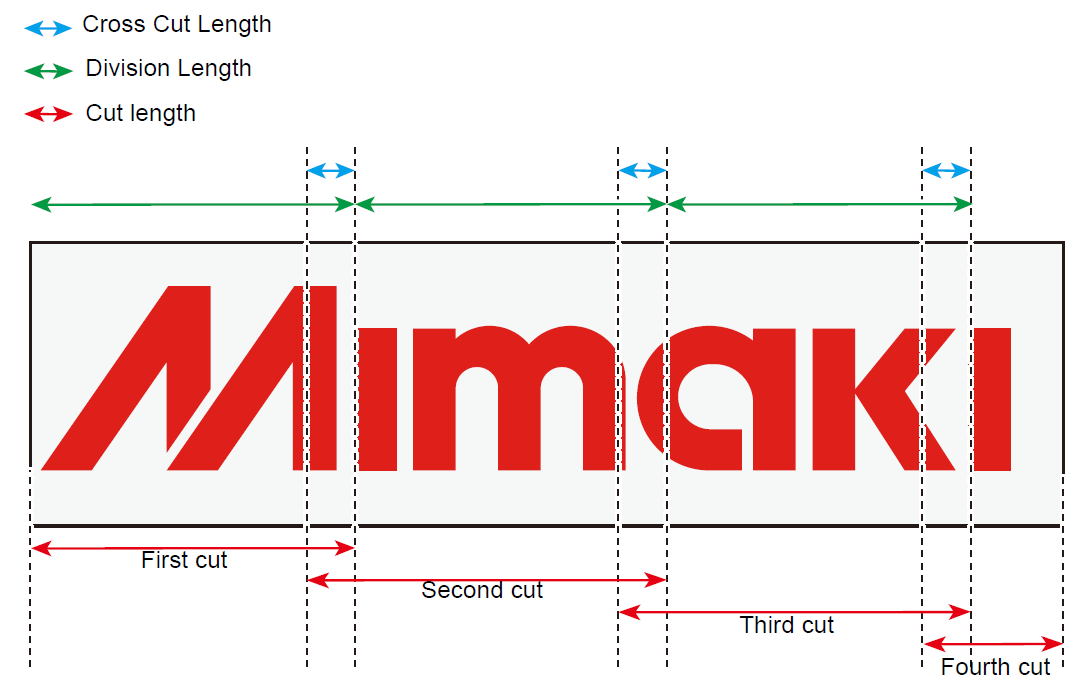
- Split cut
Sets split cutting in the feed direction. Split cutting helps to minimize cutting offsets due to the sheets meandering.
The design will be split and cut in sequence from the first sheet as shown in the following figure. Sheet feeding is performed for each split area.
Item | Explanation | Range | Default |
|---|---|---|---|
Division length (mm) | Division length in the X direction | 100 to 5000 | 500 |
Cross cut length | Length of duplicated cut range to eliminate uncut parts. | 0 to 50 | 10 |
Origin update | Selecting this updates the origin after split cutting is complete. | On/Off | On |
Origin update position | Position after origin update | 0 to 51000 | 10 |
- When the [Sort] check box is selected
Sorts by the design before splitting. - When the [Sheet Feed] check box is selected
The entire media is fed before the first cut starts. Feeding is not performed for each individual split area. - When the [Split cut] check box is selected
The [Head withdrawal after cutting] option is disabled, and the head is withdrawn to the position set for [Origin update] in [Split cut].

- When the [Split cut] is turned on, the register mark setting is automatically turned off.
- When the register mark setting is turned on, [Split cut] is automatically turned off.
- Double pass creasing(CRE)
If CRE (creasing) is selected using the tool for a cut path, that cut path will be output twice. Select this in cases where a crease is not formed with single creasing.
◆ CG-FXIIPlus |
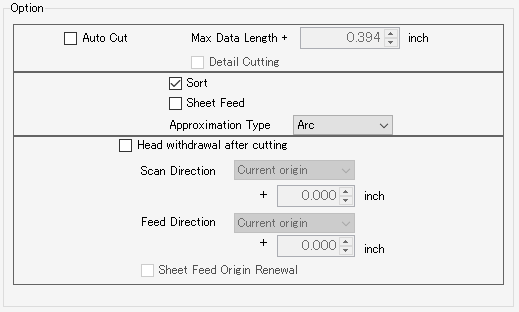
- [Auto Cut]
Selecting this automatically cuts the media once cutting has ended.
[Max Data Length +] | : | Sets the length from the end of the job to the position where it is to be cut. |
[Detail Cutting] | : | Selecting this cuts jobs laid out as copies after each line printed. |
- Head withdrawal after cutting
Sets the head position after cutting has ended. Sets the position with respect to the reference position (select [Max cut length] or [Current origin]). Selecting [Update sheet feed direction origin] sets the position after head withdrawal to the origin. Selecting this when using continuous output with identical sheets helps to prevent mistakes involving cutting over the previous cutting position.
- When two or more copies are set for [General Print] and [Individual registration marks] is selected
The [Head withdrawal after cutting] option is disabled, and [Head withdrawal after cutting] is not performed.
- Click [Apply].
- The settings are applied.
- Select the [Execute] menu, then execute print & cut.
- For more information, refer to Execute.
- Multiple images (jobs) cannot be cut consecutively.
To cut consecutively, use ID cutting. - When using RasterLink7 to output cut data, be sure to wait for cutting to end for the image (job) currently in progress.
Cutting will not be performed correctly if the next cut job is output before cutting has ended.
Print & cut origin adjustment (CJV300, CJV150, CJV300 Plus, UCJV300, CJV330, and UCJV330)
Adjusts the print & cut origin by printing and cutting an adjustment pattern.
- Select a job in the [Job List].
- Set the print & cut origin to the print conditions to be applied on the [Print Condition] screen.
- Click [Print & Cut origin adjust] on the [General Print] - [Cut Edit] tab.
- The [Print & Cut origin adjust] dialog appears.
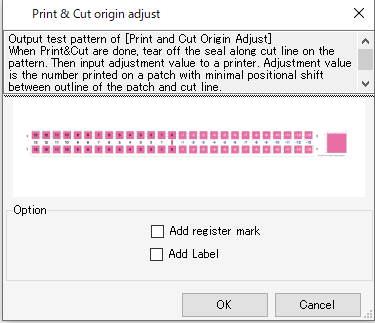
- Set the register marks and labels.
- Selecting [Add register mark] adds register marks before printing.
- Selecting [Add label] adds information about the resolution, number of paths, and waveform at the top left of the adjustment pattern.
- Click [OK].
- Printing and cutting of the adjustment pattern starts.
- Check the adjustment pattern printed and cut, then enter the X and Y adjustment values on the printer input screen.
- If the resolution or paths have been altered after adjusting the print & cut origin, the print & cut origin must be readjusted.
- The print & cut origin adjustment job will be deleted from the job list automatically once the adjustment pattern has been printed and cut.
- The print & cut origin adjustment job will not be deleted automatically if the data is cleared or an error occurs while the adjustment pattern is being printed and cut.
In such cases, jobs should be deleted manually.