Rigid Media Placement Printing - Screen Layout
[Rigid Media Placement Editing] screen

[Job List] tab
Displays the jobs to be edited in [Rigid Media Placement Editing].
[Rigid Media Placement Editing] Tab

- [Rigid Media Editing]
Select whether to enable rigid media placement printing. - [Scale]
Sets the job size. - [Rotation]
Rotates the job. - [Mirror]
Reverses the job. - [Copy]
Sets the number of job copies. - [Clip Correction Value]
If Crop setting ( ) are enabled, this function cannot be used.
Set the crop dimensions for the top, bottom, left, and right edges of the job. - [Placement]
Set the reference position for placing the job on the rigid media. - Layout Preview
Displays the state of jobs placed on rigid media. - Panel switching
Click to switch the panel.
[Rigid Media Editing] Tab
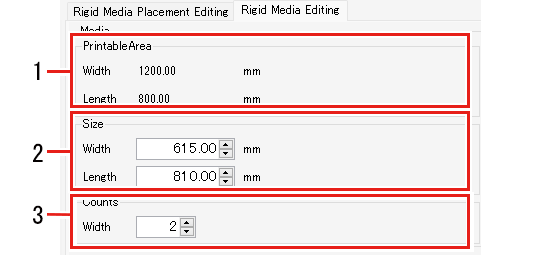
- [PrintableArea]
Displays the actual printable size for the set rigid media. - Width
- Rigid media width × width count - (Invalid print left width + right width)*1
- Length
- Rigid media height - (Invalid print top height + bottom height)
- *1) The display size includes the invalid printing area between rigid media.
- [Size]
Enter the height and width size of the rigid media. - [Counts]
Enter the count for the width direction of the rigid media.

- When connected online to the printer itself, the size and count of rigid media set on the printer will be automatically applied.
Consequently, manually entering data is not necessary unless specifically required.