Layer - Operations
Set Special Color Over Print (with models supporting Special Color Over Print)
- Select the job to be set for Special Color Over Print on the [Job List] tab.
- Click [Layer] in the [Function] menu or the [Layer] function icon (
 ).
).
- Select a job in the [Job List].
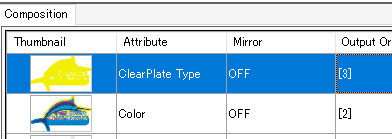
- Select [Special Color Over Print] on the [Layer Adjust] tab.
- This allows you to set whether or not to use Special Color Over Print.
- If selected, the printing order can then be selected.
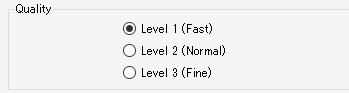
Set the quality of Special Color Over Print (with models supporting Special Color Over Print)

The quality of Special Color Over Print can be set in the following case.
- With models that support quality settings for Special Color Over Print and when Special Color Over Print is set to be used
- Select the job to be set for Special Color Over Print on the [Job List] tab.
- Click [Layer] in the [Function] menu or the [Layer] function icon ().
- Select [Quality] on the [Layer Adjust] tab.
- The quality increases from Level 1 to Level 3, but the printing speed will also be reduced.
Adjust the special color position
- Select the job to be set for Special Color Over Print on the [Job List] tab.
- Click [Layer] in the [Function] menu or the [Layer] function icon ().
- Select the special color job to adjust its position on the [Job List] tab.
- Select the [Correct the position] check box for the layer on which the special color is to be printed in [Position Correction] on the [Layer Adjust] tab.
- Enter the number of pixels (-99 to 99 pixels) for [Scan] and [Feed].
- The special color position is altered for the selected job.
- [Position Correction] should be used when there is a slight offset between special colors (such as white and clear) and colors when printing.

Adjust the special color size
- Select the job to be set for Special Color Over Print on the [Job List] tab.
- Click [Layer] in the [Function] menu or the [Layer] function icon ().
- Select a job for which special ink is to be printed on the [Job List] tab.
- Select the [Correct the size] check box for the layer on which the special color ink is to be printed in [Position Correction] on the [Layer Adjust] tab.
- Select the required items.
- [Thickening] or [Thinning] can be selected.
- Enter the number of pixels in [Scan] and [Feed].
- The special color size is altered for the selected job.
・ The size setting method is the same for all models.
・ [Special color size correction] is useful in the following cases.
・ [Special color size correction] is useful in the following cases.
- When you wish to print clear ink to cover a color job
- When you wish to print a special color (white or primer) slightly smaller because the white or primer ink printed as the base will be printed protruding from the color
