Printer Management - Operations
Add a printer
- Select [Environments] - [Printer Management] from the menu.
- The [Printer Management] dialog appears.
- Click [Add].
- The [Printer Setting] dialog appears.
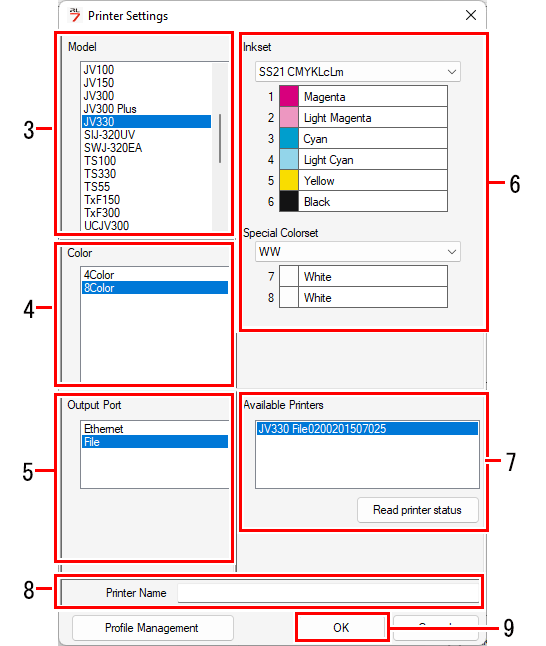
- Select the printer model.
- Select the printer color.
- Select the output port type.
- Select the inkset and special color set that are set in the printer.
- If [USB2.0] or [Ethernet] is selected for [Output Port], select the printer to be connected from [Available Printers].
- Clicking [Read printer status] updates the [Available Printers] information.
- Enter a suitable name.

- At least one device profile must have been installed for the printer to be registered.
Before clicking [OK], click [Profile Management] to launch Profile Manager and check to confirm that a profile has been installed.
- Click [OK].
- Printer addition and the settings are applied.
Delete a registered printer
- Select [Environments] - [Printer Management] from the menu.
- The [Printer Management] dialog appears.
- Click the printer to be deleted.
- Click [Delete].
- The selected printer will be deleted from the list.

- Deleting a printer also deletes all of the jobs registered to that printer.
Check and edit registered printer settings
- Select [Environments] - [Printer Management] from the menu.
- The [Printer Management] dialog appears.
- Click [Properties].
- The [Printer Setting] dialog appears.
Setting a function icon
- Select [Environments] - [Printer Management] from the menu.
- The [Printer Management] dialog appears.
- Select the target printer, then click the function icon.
- The [Function icon setting] dialog appears.
- Only those function icons supported by the selected printer are displayed.
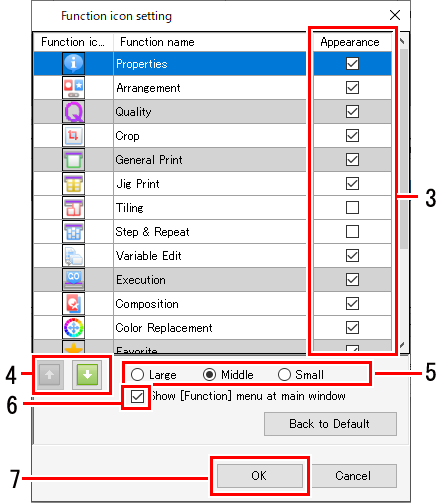
- Select the [Appearance] check box.
- Selecting this displays the function icons and unselecting it hides the icons.
Note that the check box cannot be unselected if the function name background is gray.
- Select a function, then click the [
 ] icon.
- The function icon display order is refreshed.
- Select the function icon size.
- Select or deselect the [Show [Function] menu at main window] check box.
- Selecting this displays the menu bar and unselecting it hides the menu bar.
- Click [OK].
- The function icon settings are applied.
- Clicking [Back to Default] restores the initial settings.
Configure the cutting device settings
A cutting device that supports RasterLink7 can be linked to a registered printer.
Data can be sent directly from RasterLink7 to the linked cutting device.
For more information on how to link devices, refer to the separate "RasterLink7 Installation Guide".