Special plate - Operations
Create a special color job
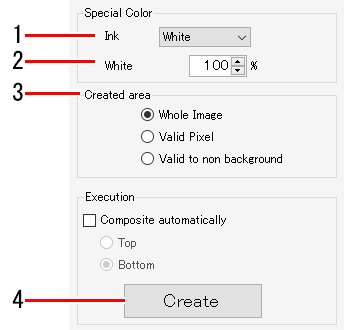
- Select the special color ink from the [Ink] list in Special Color Ink on the [Special plate] tab.
- The special color inks available will vary depending on the special color inkset in the printer being used.

- Only one special ink can be selected. More than one special color ink cannot be selected simultaneously.
- Set the ink density (%).
- The default value is 100%.

- Special color jobs created using [Special plate] will be replaced by mono color solid special color data ignoring the color density of the original image.
- With [Special plate], the ink density of a special plate job will be the ink density set in [Special Color] at the time of creation or the ink density set in Editing the settings for a special color job created using Special plate. The density of the special color ink cannot be varied within a single special color job.
- If you wish to vary the special color ink density within a single special color job, such as when using gradations, create the special color image data, then set the special color ink as described in Print a full-color job in monotone.
- Select [Special Color Print Area].
- [Whole Image]: Prints the entire rectangle of the original image using the special color ink.
- [Valid Pixel]: Outputs special color ink only where there is color in the original image.
- [Valid to non background]: Outputs special color ink where there is data (including white) in the original image.


- To place TIFF data with transparency, save the image as a PDF.
For images saved in EPS or PS format, special colors are generated with the rectangle of the TIFF data treated as the data portion.
- To fill the interior of the figure completely with special color ink as shown below without using the [Valid to non background] setting, create special color data using design software, then set the special color ink as described in Print a full-color job in monotone.

- When you use Adobe Illustrator for the design software, special color data like that described above can be created easily using RasterLinkTools. For more information, refer to "A special color is printed over the entire image." in the separate "RasterLinkTools Guide".
- If image data includes objects with density less than 1%, these may be included in the printed output recognized as valid pixels even if they do not seem to be recognized as valid pixels in the preview.
To have these objects recognized as valid pixels in previews, set object density to at least 1% in the design software.
- Click [Create] in [Execute].
- A special color job is created and added to the job list.
- Depending on the ink and UV mode set for a special color job, colors similar to those shown below will be displayed in [Thumbnail] on the [Job List] tab. For more information on UV mode settings, refer to Edit UV settings

- "Clear (UV Mode)" is displayed in [Attribute] for special color jobs created by selecting "Clear".
Create a special color job and combine it with the original job
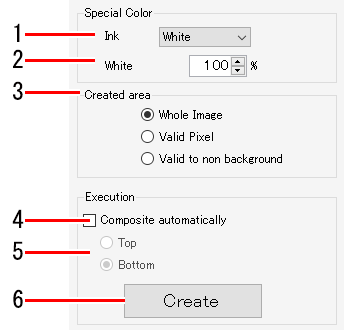
- Select the special color ink from the [Ink] list in [Special Color] on the [Special plate] tab.
- Set the ink density (%).
- Select [Special Color Print Area].
- Select the [Composite automatically] check box.
- Select the [Execute] items.
[Top]: Combines by laying the special color job over the original job.
[Bottom]: Combines by laying the special color job under the original job.
- Click [Create].
- The composition of composite jobs can be canceled using "Composite" Composite.
- When creating multiple special color jobs and combining them (such as when creating white and clear special color jobs from a single job), special plates cannot be created from composite jobs, so unselect the [Composite automatically] check box, create the special color jobs, then use "Composite" Composite.