Jig Print - Screen Layout
[Jig Print] screen

[Job List] tab
Displays the jobs to be edited in [Jig Print].
Jig template selection
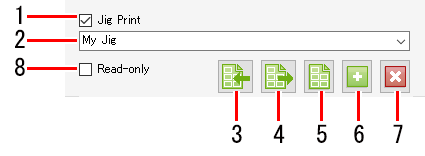
- [Jig Print]
Select whether or not to use jig printing. - Jig template name
Select a jig template.  Duplicate the jig in the scanning direction
Creates a new jig definition file by duplicating multiple materials within the jig definition file as a single group in the scanning direction.
For copied jigs, the values of [Size], [Counts], and [Interval] (Pitch) under [Material] cannot be changed. Import a jig definition file
Imports a jig template definition file to RasterLink7. Export a jig definition file
Saves a jig template definition file as an xml format file. Print jig outline
Prints a jig outline. For information on how to print the jig outline with the UJ330H, refer to the Important note (When using UJ330H) at the end of this description.
 Add jig template
Adds a new jig template. Delete jig template
Deletes a jig template.- [Read-only]
Selects whether jigs are read-only or can be edited.

- Save the jig outline image as a PDF file for use. (The [Print] button on the [Print jig outline] screen cannot be used.)
- When loading a jig outline image into RasterLink7, enable [Rigid Media Editing] on the [Rigid Media Placement Printing] screen before printing.
- When printing without enabling [Rigid Media Editing], a margin equal to the standard right media margin (or the margin after it is applied if margins are set) will be added in the width direction.
[Jig Layout] tab, [Jig Definition] tab, Preview

- [Scale]
Sets the job size. - [Rotation]
Rotates the job. - [Mirror]
Reverses the job. - [Copy]
Sets the number of job copies. - Layout Preview
Displays the job positioned on the jig template. - Panel switching
Click to switch the panel.

[Jig Definition] tab
| 1. [Size] Sets the overall jig size. |
2. [Position] Sets the distance from the print origin position to the lower right of the jig. | |
3. [Deskew] Sets the jig skew. | |
4. [Size] Sets the size for one material. | |
5. Counts Sets the number of materials to be positioned. | |
6. [Interval (Pitch)] Sets the material spacing. | |
7. [First position] Sets the distance from the lower right of the jig to the lower right of the first material. | |
8. [Placement] Sets the material position used as the reference for placing jobs. | |
9. [Material] Selects the material to be adjusted. | |
10. [Skip] Selects whether or not to include a material in printing. | |
11. [Position] Adjusts the material position. |


