Execute - Operations
Rip and print
- Select a job in the [Job List].
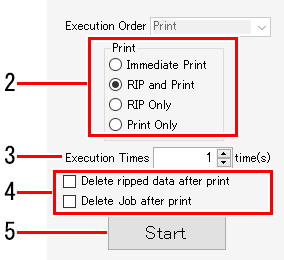
- Select the items in [Print] on the [Execute] tab.
- [Immediate Print]: Rips and prints simultaneously.

- Depending on the printer model and other conditions, [RIP and Print] may be executed automatically, even if [Immediate Print] is set. (Conditions)
- If the original image data is complex, printing may pause when ripping is unable to keep up with the printing speed. [RIP and Print] should be selected in such cases.
- Ripped data will not be created if [Immediate Print] is selected.
- [RIP and Print]: Printing is executed after ripping is complete.
Ripped data is created.
- [RIP Only]: Only ripping is performed. Printing is not performed.
Ripped data is created.
- [Print Only]: Only printing is performed.
- [RIP and Print] will be executed automatically if [Print Only] is selected when no ripped data has been created.
- Hovering the mouse over a job on the [Job List] tab displays various status information for that job.
Bold job names on the [Job List] tab indicate jobs for which ripped data has been created.
- Enter the number of times for executing ripping and printing in [Execution Times].
- Ripped data will not be created if [Immediate Print] is selected. Ripping and printing will be executed just for the number of times set.
- Set the deletion processing for data after printing in Execution Option.
- [Delete ripped data after print]: When this is selected, ripped data will be deleted after printing if the execution order is set as [RIP and Print] or [Print Only].
- [Delete Job after print]: When this is selected, the job will be deleted after printing if the execution order is set as [Immediate Print], [RIP and Print], or [Print Only].
- Click [Start].
- The processing specified for [Print] starts.
Print and cut (with a print & cut machine and ID cut job)
- Select a job in the [Job List].
- Select the required items from the [Execution Order] list.
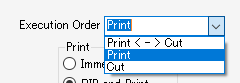
- [Print <-> Cut]: Prints and cuts.
- [Print]: Only printing is performed.
- [Cut]: Only cutting is performed.
- Select the items in [Print].
- The item details are the same as for Rip and print.
- Enter the number of times for executing printing and cutting in [Execution Times].
- Set the deletion processing for data after printing.
- The item details are the same as for Rip and print.
- Click [Start].
- Printing and cutting starts.
Print and cut (with a linked cutting device)
- Select a job in the [Job List].
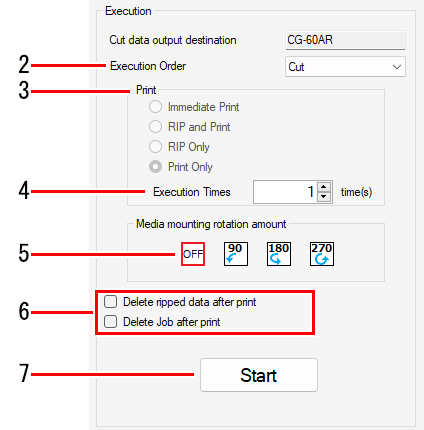
- Select the execution method from the [Execution Order] list.

If a cutting device is linked
- To output print data to a printer, select [Printer].
- To output cut data to a cutting device, select [Cut].
- Select the items in [Print].
- The item details are the same as for Rip and print.
- Enter the number of times for executing printing and cutting in [Execution Times].
- When cutting using a cutting device after printing, be sure to set the same number of execution times for both printing and cutting.
- If [Cut] is selected for [Execution Order], select [Media mounting rotation amount]. [Execute] tab
- Set the deletion processing for data after printing.
- The item details are the same as for Rip and print.
- Click [Start].
- Printing or cutting starts.
Estimate ink consumption
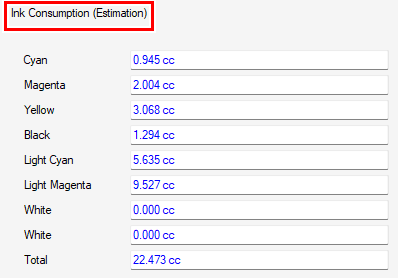
Calculate how much ink will be used for the jobs selected before ripping or printing.
- This function can be used when RasterLink7 is connected to a printer with the power turned on.
- The data used for estimation is set in [Option] - [Job Control]. ([Option])
The processing speed and accuracy will vary depending on the settings. - This function cannot be used if the [Calculate Ink Consumption] check box is selected on the [Option] window and the job has already been ripped or printed, as ink consumption is calculated based on the ripping results.
- Select a job in the [Job List].
- It can be used even when multiple jobs are selected.
- Click [Ink Consumption Estimation] on the [Execute] tab.
- The ink saving settings are displayed for printers that support ink saving.
Print with reduced ink consumption
These settings can be used to check variations in the ink levels due to the ink saving settings.
- The progress indicator window is displayed while processing is in progress.
- Once processing is complete, the results can be checked in either of the following two ways:
- [Properties] window for each job
Values for [Ink Consumption (Estimation)] are displayed in the [Results] column for each job.
- [Log] window
The results are displayed on the log window.
If multiple jobs were selected, the total value is displayed.
