- Please check the following contents.
Please see the following steps with 『Operation Manual 』 and 『Daily Care Manual 』.
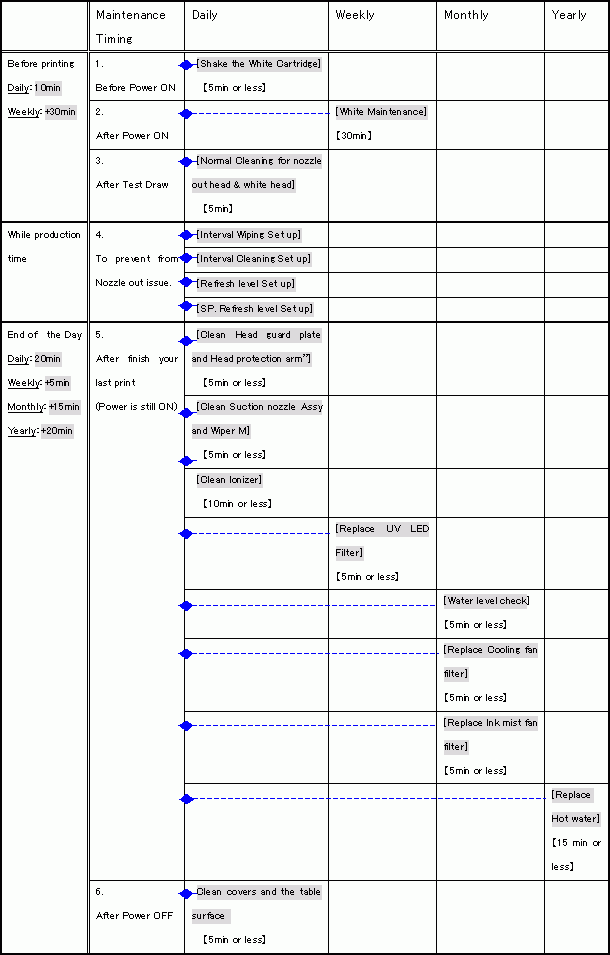
Maintenance Flow

[Detail]:
[Before start printing]:
1. Before Power ON the printer
・ [Daily]: Shake White cartridges
Remove the White cartridges and reinsert after shaking them well.
【How to shake it】:Please refer the following document.
『Operation manual 』-[Chapter4]-[Ink cartridge]-[How to shake an ink cartridge]
※ Please use caution when shaking the cartridge. If you shake it aggressively, the internal metal plate may damage the ink pack or the cartridge case. The ink cartridge is heavy, use caution when handling it.
2. After Power ON the printer
・ [Weekly]: [White Maintenance]
The white ink precipitates easily compared to other ink colors.
If you leave the printer for over two weeks, the white ink will precipitate. If it precipitates inside the ink line or inkjet nozzle, you will have Ink mist, Nozzle deflection, and Nozzle out issues. It will take time to recover from these issues, and we may have to replace parts, such as the print head or ink tube.
So please perform “White Maintenance” once a week.
【Procedure】:Please see the following document to see more detail.
『Operation manual 』-[Chapter 4]-[Regular maintenance for white ink]
3. After Test Drawing
・ [Daily]: Operate a Normal cleaning on White color and the color which had nozzle out.
Operate TEST DRAW at least once a day for the white head even if you do not use white ink..
[While production time]:
4. Settings to prevent from nozzle out issue
・ [Daily]: Interval Wiping set up
Printer will have interval wiping automatically to clean the print head nozzle surface.
【Set up procedure】: Please see the following document to see details.
『Operation manual 』-[Chapter4]-[Cleaning nozzle face automatically]-[Setting of Interval Wiping]
・ [Daily]: Interval Cleaning set up
Printer will have interval cleaning automatically to clean the print head nozzle surface.
【Set up procedure】: Please see the following document to see details.
『Operation manual 』-[Chapter4]-[Cleaning nozzle face automatically]-[Setting of Interval Cleaning]
・ [Daily]: Refresh level set up
The Refresh helps to reduce nozzle out issue while printing.
【Set up procedure】: Please see the following document to see details.
『Operation manual 』-[Chapter 3]-[Each setting]-[Other useful functions]
・ [Daily]: Special ink Refresh set up
The Special Refresh helps to reduce nozzle out issue on White ink.
【Set up procedure】: Please see the following document to see details.
『Operation manual 』-[Chapter 4]-[Prevent the nozzle clogging of special color]
[End of the day]:
5. After you finish printing your last job: (Power is still on)
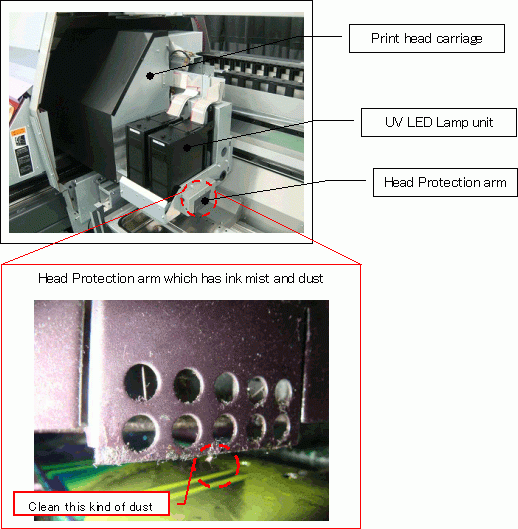
・ [Daily]: Clean a Head guard plate surface and Head protection arm
If you do not clean the head plate, the contaminants will attract excess ink The collected ink will drop on the media surface. It will also cause nozzle out issues.
【Clean up procedure】: Please see the following document to clean the Head guard plate.
『Operation manual 』-[Chapter 4]-[Avoiding dripping of ink droplet at printing]
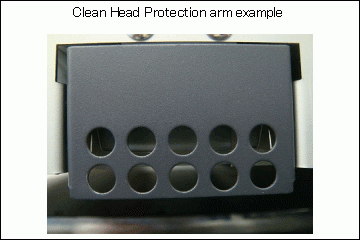
【Clean up procedure】: Please see the following pictures to clean the Head protection arm.


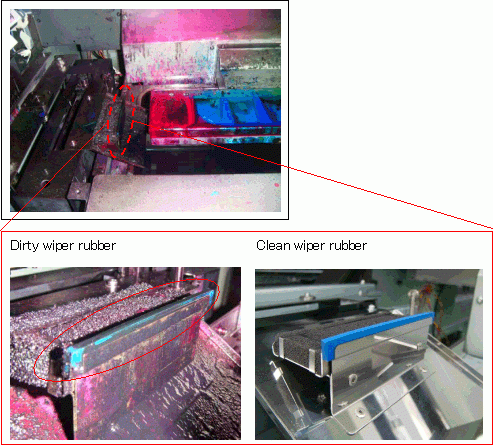
・ [Daily]: Clean the Suction nozzle Assy, Wiper M, and Wiper rubber
If these parts are dirty, print result will also have nozzle out issue or nozzle clogging issue.
So please clean these daily, and replace it if you need.
【Cleaning Procedure】: Please refer to the following document to see detail to clean a Suction nozzle Assy and Wiper M.
『Operation manual 』-[Chapter 4]-[Cleaning of Wiper]
【Cleaning Procedure】: Refer to the following steps to clean a wiper rubber.

・ [Daily]: Ionizer maintenance
The antistatic effect will be reduced if an Ionizer has dust or ink mist on its needles.
If you keep printing with this lack of maintenance condition, it becomes cause of “Nozzle out”, “Nozzle clogged”, and “Ink mist” issues.
【Maintenance Procedure】: Refer to the following document.
『Daily care for ionizer』
・ [Weekly]: Clean or Replace “UV lamp filter”
This is the filter which is mounted on each UV lamps. If this filter is clogged by dust or ink mist, the UV lamp life time will be reduced by high temperature heat inside the lamp box.
【Procedure to replace】: Refer to the following document.
『Operation manual 』-[Chapter 4 Maintenance]-[Replacing the UV LED filter]
・ [Monthly]: Clean or Replace “Cooling fan filter”
This is a filter which is mounted on each “Fans” inside Y gantry cover to reduce heat inside..
【Procedure to replace】: Refer to the following document.
『Operation manual 』-[ Chapter 4 Maintenance]-[Replacing the filter of the cooling fan]
・ [Monthly]: Clean or Replace “Ink mist filter”
This is a filter which is mounted on left side flushing station.
【Procedure to replace】: Refer to the following document.
『Operation manual 』-[ Chapter 4 Maintenance]-[Replacing the mist suction filter]
・ [Yearly]: Change hot water
Discharge and change hot water for whole water line once a year.
【Procedure to change】: Refer to the following document.
『Operation manual 』-[ Chapter 4 Maintenance]-[Replacing water in water heater tank]-[Replacement method of antifreeze liquid water]-[Replacing using water heater exchange mode]
Mix both water and antifreeze liquid, but make sure the ratio to mix is “Water(1000cc):Antifreeze(500cc)”.
If you put Antifreeze too much, the temperature does not get high easily, and machine will have a Hot water error.
② After Turn off power
・ [Daily]: Clean table surface, cover surface.
Clean the all printer surfaces, and make sure there is no dust on it.
If there is too much dust, it can be “Nozzle out”, “Nozzle clogged” and “Ink mist” issues.
