- See the following to resolve the error.
■The register mark detection function is malfunctioning.
Check to see if the following table of settings made in either FineCut or RasterLink6
is equivalent to the settings in MENU -> CUTTING -> REGISTER MARK DETECTION.

See 『Operation Manual』-> [Chapter 4 Cutting Function]
-> [Cut Out Data with Registration Mark] for the details.
Click here to see the CJV150 Operation Manual.
Click here to see the CJV300 Operation Manual.
■Have used register marks created in design software
It's not capable of reading register marks created in design software such as
Adobe Illustrator. Create your register marks with FineCut8 or RasterLink6.
See 『FineCut8 Operation Manual』 -> [CHAPTER 3 Creating Register Marks]
-> [Making Register Marks] to learn about how to create register marks.
Click here to see the FineCut8 Operation manual for Adobe Illustrator.
Click here to see the FineCut8 Operation manual for CorelDRAW.
■Have used non-white colored media. The color of the register marks is not black
・Turn the color of the register marks into black.
・When using media other than the color white, then it may not read the register
marks on it.
Use the function, [Fill around the register mark]in Finecut8, then it may read the
register marks if the surrounding areas are colored in red spot color.

See 『FineCut8 Operation Manual』 -> [CHAPTER 3 Creating Register Marks]
-> [Making Register Marks] to learn about how to create register marks.
Click here to see the FineCut8 Operation manual for Adobe Illustrator.
Click here to see the FineCut8 Operation manual for CorelDRAW.
*Ensure to turn ON the function, MENU -> Cutting -> TP DETECT
-> MARK FILLUP when operating the function.
Click here to see the CJV150 Operation Manual.
Click here to see the CJV300 Operation Manual.
■The printed register mark is blurred
When the register marks are blurred, the printer cannot read them. Even if it does,
the cutting operation may go off the cutting track.

■ RIP has magnified or shrank down the data contains register marks created
in FineCut8
When outputting data from the printer, never magnify or shrink the size of
the data. The register sensor will be no longer capable of reading register marks.
■The size of register marks is small
When the size of register marks are too small to recognize, it may not detect them
properly. Use appropriate size of register marks. The following table shows correct
size of register marks for each type; the correct size of register mark (B) against the
distance between the register marks (A).
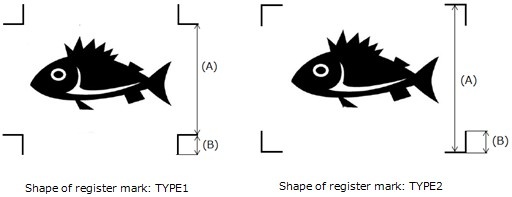

See 『Operation manual』-> [Chapter 4 Cutting Function]
-> [Cut Out Data with Registration Mark] for the details.
Click here to see CJV150 operation manual.
Click here to see CJV300 operation manual.
■ When detecting register marks in manual operation, the position of light pointer is
incorrect
When detecting register marks in manual operation, move the position of light pointer
over to the following register mark position.
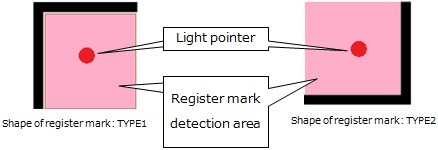
See 『Operation manual』 -> [Chapter 4 Cutting Function]
-> [Cut Out Data with Registration Mark] for the details.
Click here to see CJV150 operation manual.
Click here to see CJV300 operation manual.
■ Some data are printed in print-free area surrounding the register marks
Note that the area surrounding register mark is print-free; never print any data on
the area. Also ensure that the area should be stain-free. The register mark sensor
may misread a stain as a register mark.
Shape of register mark: TYPE1 Click on Image to zoom
Shape of register mark: TYPE2 Click on Image to zoom
See 『Operation manual』 -> [Chapter 4 Cutting Function]
-> [Cut Out Data with Registration Mark] for the details.
Click here to see CJV150 operation manual.
Click here to see CJV300 operation manual.
■ The distance between the register marks of two separate images are too narrow
When the distance between the register marks of two separate image are too narrow,
it may not detect register marks properly.
【The case when the shape of register mark is TYPE1】
Make the distance more than twice as long as the side of the register mark and less
than 1000mm.
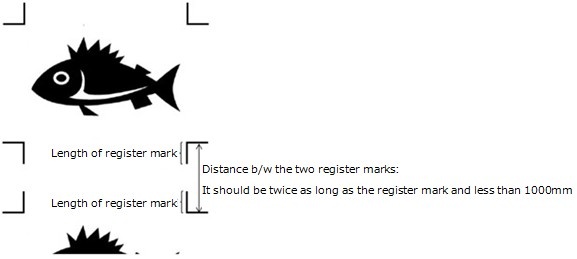
Shape of register mark: TYPE1
【The case when the shape of the register mark is type2】
Make the distance more than the side of the register mark and less than 1000mm.
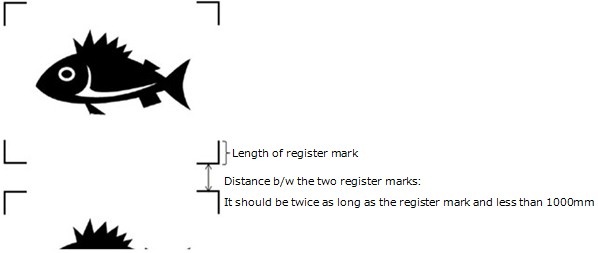
Shape of register mark: TYPE2
See 『Operation manual』 -> [Chapter 4 Cutting Function]
-> [Cut Out Data with Registration Mark] for the details.
Click here to see CJV150 operation manual.
Click here to see CJV300 operation manual.
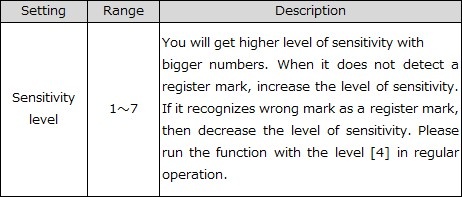
■Increase sensitivity level of the sensor
Change the printer settings on the sensitivity level at MENU -> Cutting -> TP DETECT.
See 『Operation Manual』-> [Chapter 4 Cutting Function]
-> [Cut Out Data with Registration Mark] for the details.
Click here to see the CJV150 Operation Manual.
Click here to see the CJV300 Operation Manual.
■Adjusting the position of light pointer
When it does not read register marks, the position of the register sensor and light
pointer may not match.
Go to MENU -> Cutting -> MAINTENANCE -> MARK SENSOR -> POINTER OFFSET
and adjust the position of the light pointer on the printer.
See 『Operation Manual』-> [Chapter 4 Cutting Function]
-> [Cut Out Data with Registration Mark] for the details.
Click here to see the CJV150 Operation Manual.
Click here to see the CJV300 Operation Manual.


