Job Operations - Screen Layout
Explanation of screen
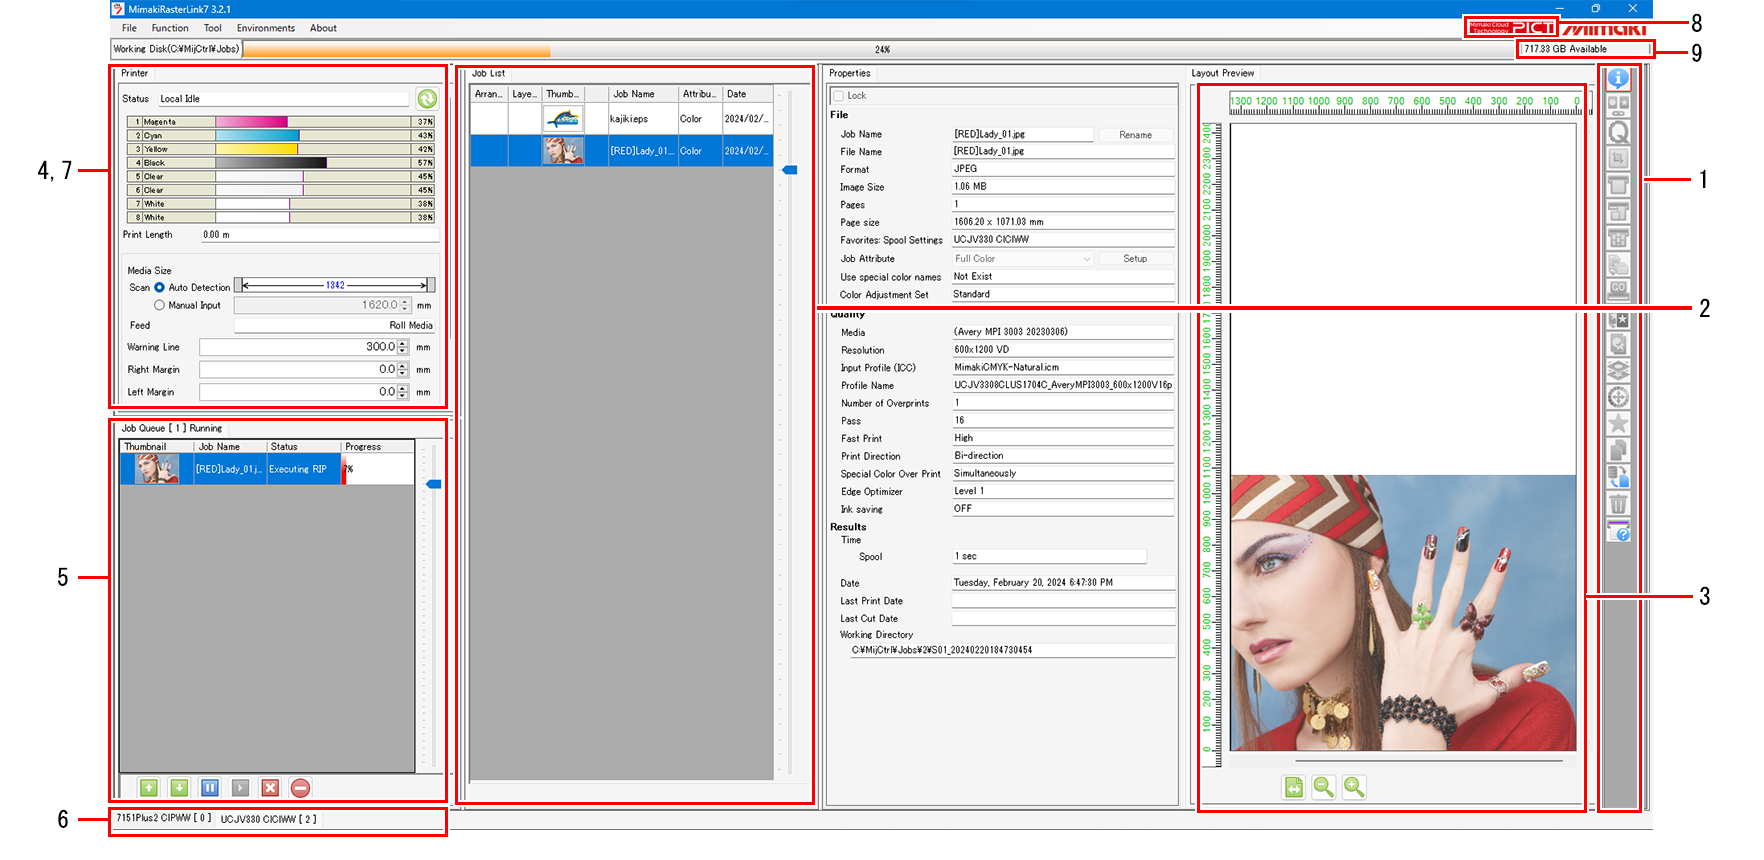
1. Title Bar
The RasterLink7 version and the current user's permissions are displayed.
2. Function icons
Click on an icon to go to the setup screen for the corresponding functions. The icons for functions that are not available are grayed out. A scroll bar is displayed if there are more icons than can fit on the screen.

- The icons displayed will vary depending on the printer being used.
- The icons that can be selected will vary depending on the individual job.
- The icons can be resized, and unwanted icons can be hidden. For more information, refer to Setting a function icon.
3. [Job List] tab
Displays the job list. This is displayed when any of the following functions are selected:
[Properties], [Arrange], [Composite], [Special plate], [Execute], [Duplicate], [Backup], [Delete]
4. [Layout Preview]
Displays the layout status for the jobs selected in [Job List].
This can be hidden or shown using the [Display] tab on the [Option] window. Set the display
5. [Printer] tab
Displays information on the currently connected printer. This is displayed when any of the following functions are selected:
[Properties], [Arrange], [Composite], [Special plate], [Execute], [Duplicate], [Backup], [Delete]
- The details displayed will vary depending on the printer being used.
6. [Job Queue] tab
- Displays the image data importing, RIP, and print status. This is displayed when any of the following functions are selected:
[Properties], [Arrange], [Composite], [Special plate], [Execute], [Duplicate], [Backup], [Delete] 
- "Auto executing" is displayed on the [Job Queue] tab when auto execution startsAuto run screen.
- The process order can be altered, and jobs can be paused, restarted, or stopped. For more information, refer to [Job Queue] tab.
7. [Printer Select] tab
Selects the corresponding screen for each printer registered in [Printer Management]. The total number of jobs created for that printer appears next to the printer name.

8. [Print progress] tab
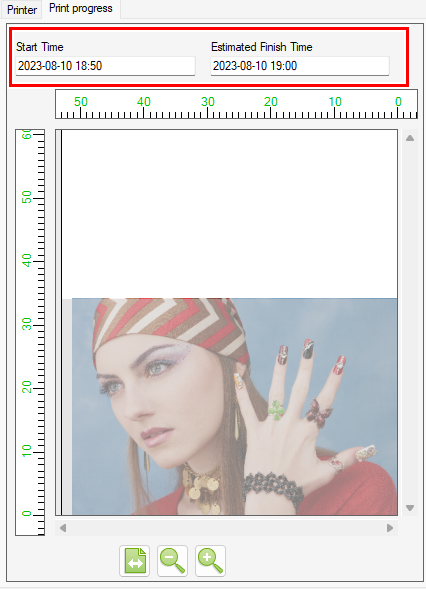
Opening this tab while printing a job on a supported device displays the print start time and scheduled print end time.
- This window is displayed when the [Environments] - [Option] - [Display] - [Display print progress] check box is selected. Set the display
- Supported devices
JV300, JV150, CJV300, CJV150, UCJV300, JV300 Plus, CJV300 Plus, JV100, TS100, JV330, CJV330, TS330, UCJV330, TxF150, TxF300, CJV200, JV200, TS330-DS, Tx330, Tx330-Hybrid, UJV300DTF, UJV100, UJV100Plus, TS200, UJV200, UJ330H
- The print progress does not appear when Print & Cut jobs or pull back printing is set.
9. [PICT] button
Access the PICT cloud-based printer status monitoring tool.
For more information about PICT, see the following website.
https://mimaki.com/product/software/remote/pict/
10. Working disk usage
Displays the amount of disk usage on the drive where the working folder is stored.
This can be hidden or shown using the [Display] tab on the [Option] window. Set the display
[Job List] window
- Explanation of columns
![[Job List] window Explanation of each column](https://d2w577gk9zpoty.cloudfront.net/themes/manual@mimaki/raster-link7/reference_guide/en-US/../Images/png/527057291__en-US__Web.png)
Column | Overview | Sort*1 |
|---|---|---|
[PrintGroup] | Grouped jobs are linked by lines PrintGroup. |
|
[Arrange] | Arranged jobs are linked by lines Arrange - Functions. |
|
[Composite] | Composite jobs are linked by lines Composite. |
|
[Thumbnail] | Displays the job thumbnails. |
|
(Lock icon) | This icon is displayed to indicate that the job is locked. Properties |
|
[Job Name] | Displays the job names. This can be changed in Job Properties Properties - Functions. |
|
[Attribute] | Displays the job attributes. The attributes will vary depending on the settings.
Other attributes are explained for the respective settings. |
|
[Copy] | Displays the copies set on the General Print screen. | |
[Rotation] | Displays the rotation settings set on the General Print screen. | |
[Mirror] | Displays the results of the mirror settings set on the General Print screen and the Composite screen. | |
Date | Displays the date and time on which the job was registered. |
|
Last print date | Displays the date and time when the last printing was performed. |
|
Last cut date | Displays the date and time when the last cutting was performed. |
|
 *2
*2- Clicking the corresponding title row sorts by grouped (layered/arranged) job. Grouped jobs are sorted based on the information for the top job.
- Sorts by job name. (Has the same effect as clicking on the job name.)
- Ripped data appears in bold font.
- The slider on the [Job List] tab can be moved up and down to adjust the list spacing.
- Right-click a column of the [Job List] to display a pop-up menu, allowing you to display or hide individual columns. Columns are displayed if they are checked on the menu.
![Right-clicking a column in the [Job List] window displays a pop-up menu.](https://d2w577gk9zpoty.cloudfront.net/themes/manual@mimaki/raster-link7/reference_guide/en-US/../Images/png/527078795__en-US__Web.png)
- Explanation of job background colors
Color | Status | |
| (white) | Queued |
| (green) | Executed
|
| (cream) | Printed, but no ripped data exists
|
| (pink) | Aborted |
| (magenta) | Error |
| (blue) | Currently being executed |


- Explanation of pop-up (right-click) menu
Select a job and right-click to display a pop-up menu.
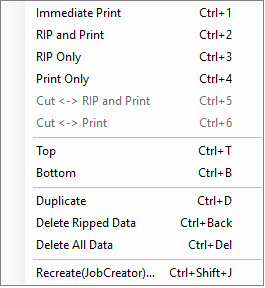
[Immediate Print] [RIP and Print] [RIP Only] [Print Only] [Cut <-> RIP and Print] [Print <-> Cut] [Cut Only] | Executes the selected job Execute. |
[Top] | Moves the selected job to the top of the [Job List]. |
[Bottom] | Moves the selected job to the bottom of the [Job List]. |
[Duplicate] | Duplicates the selected job Duplicate. |
[Delete Ripped Data] | Deletes the ripped data for the selected job Delete. |
[Delete All Data] | Deletes the selected job Delete. |
[Recreate(JobCreator)...] | Imports the selected job into the JobCreator template and uses the template to re-create the job. For more information on JobCreator, refer to the separate "JobCreator Guide". |
- When double-click the job of [Job List], moves to the General Print screen General Print - Screen Layout.